
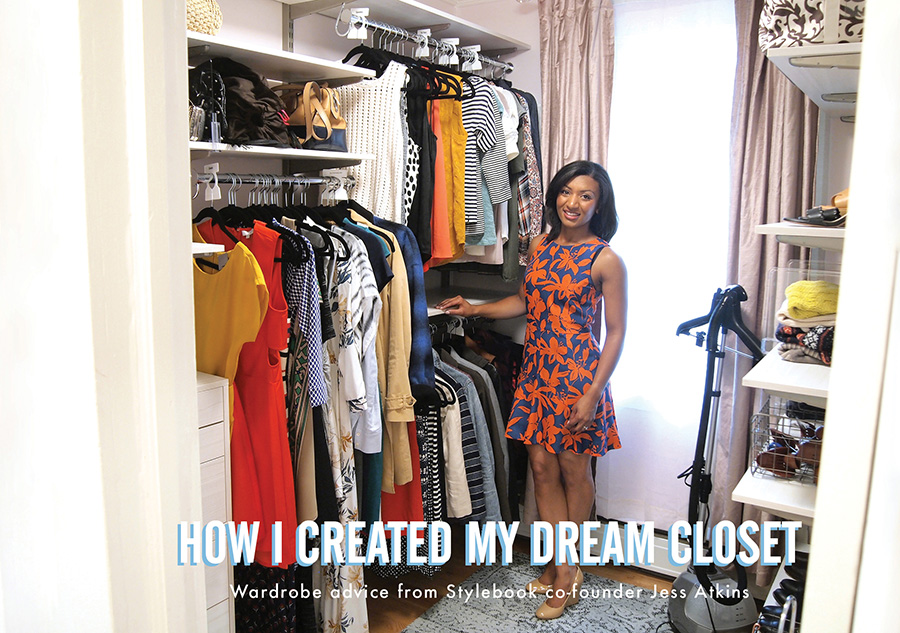
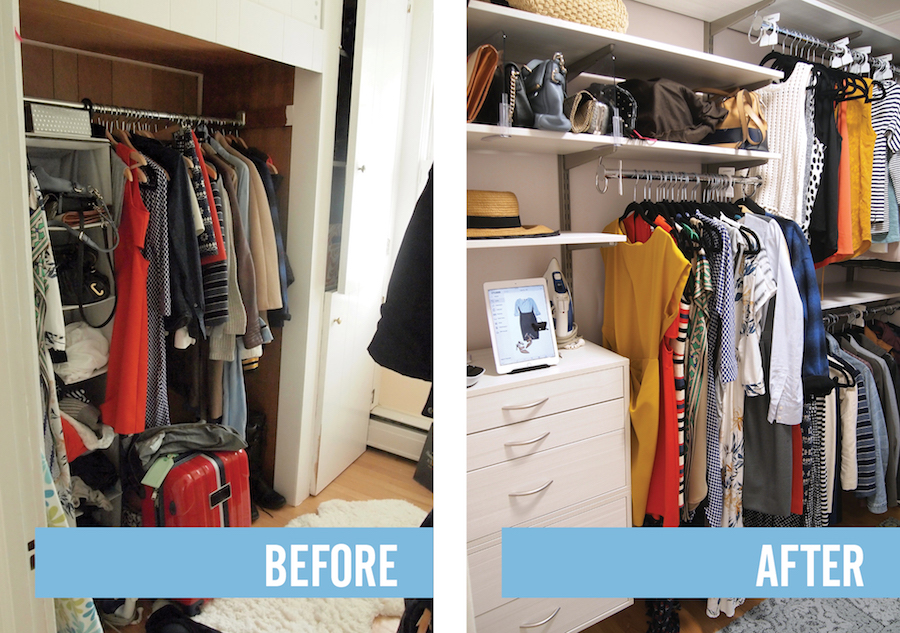
Ever since I started using Pinterest, I’ve had a board dedicated to keeping track of the gorgeous closets people share, but I never thought I could have a space like that of my own. Actually, despite having all of my clothes organized virtually inside Stylebook, the truth is that my real-life closet was a mess. This was a bit embarrassing because, as the co-founder of Stylebook - an app that tracks and organizes your wardrobe - I should really have a neat physical closet as well! I realized that the ability to see my wardrobe inside Stylebook has helped me improve my personal style, so why wouldn’t organizing my real-life closet do the same? With this in mind, I recently decided to give my closet a makeover.
I was lucky enough to have my own walk-in closet (the room is about 6x7ft), but unfortunately most of the space was wasted by a poorly made built-in unit circa 1960 that was there when I moved in. So I removed the old built-in unit and started planning. When our partners at Organized Living heard what I was doing, they offered to help me maximize my little closet’s storage potential with a custom closet system.
My goal was to feel like I was browsing my own personal boutique every morning, instead of rummaging through the piles of clothes practically overflowing from my overstuffed dresser. Even though I choose a saved outfit from my Stylebook closet every morning, it was still an adventure to actually locate those pieces of clothing in my house, especially as I got closer to laundry day. I wanted to get ready faster every morning, even when I was running out of clean clothes. Achieving this wasn’t as difficult as you might think! Here are the most useful tips and tricks I learned when organizing and decorating my walk-in closet, so you can do the same.
Since I use Stylebook regularly to track my wardrobe, I didn’t have much to clean out, but there were still some items that I simply didn't like, had worn out or didn’t fit anymore that needed to go. Before I could do any organizing, I had to get rid of anything that I wasn’t going to wear.
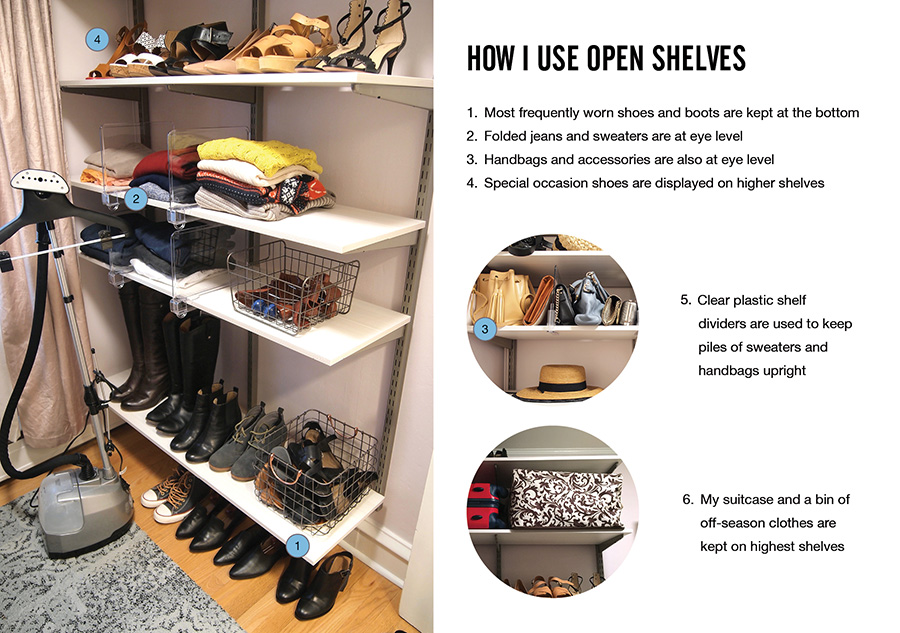
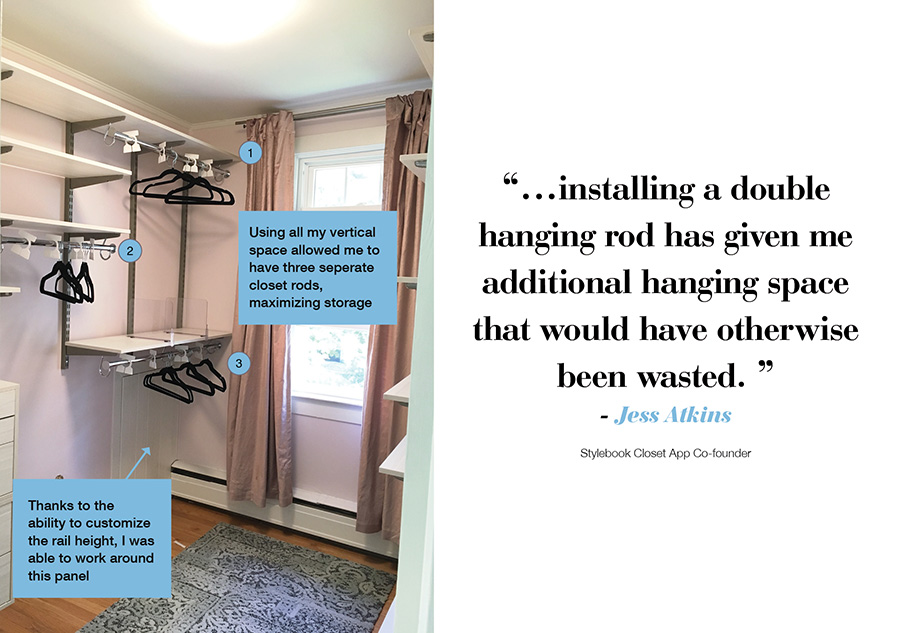
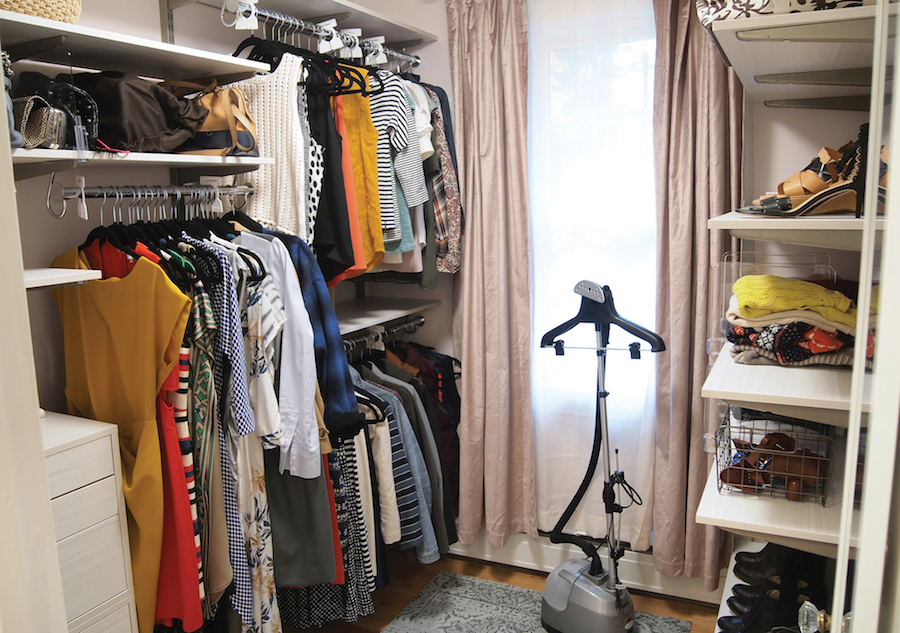
The biggest difference between my new closet system and the old built-in unit is that I can now use every inch of free wall space in the closet. Organized Living’s FreedomRail closet system is customizable, so it helped me take advantage of every square inch of my closet’s storage space from the floor to the ceiling. I was even able to work around a plumbing access panel without losing any storage (it’s behind the double closet rod). I use the higher shelves for items I don’t wear as frequently and for off-season storage. I keep a step stool handy to reach the top shelves.
I prefer to hang up most of my clothes - they can be seen more easily and I think hangers naturally keep clothes orderly. In the past, the space under my hanging clothes became a place for old shoe boxes and junk, but installing a double hanging rod has given me additional hanging space that would have otherwise been wasted. I also made sure there was still a tall section for long, hanging items like dresses and coats.
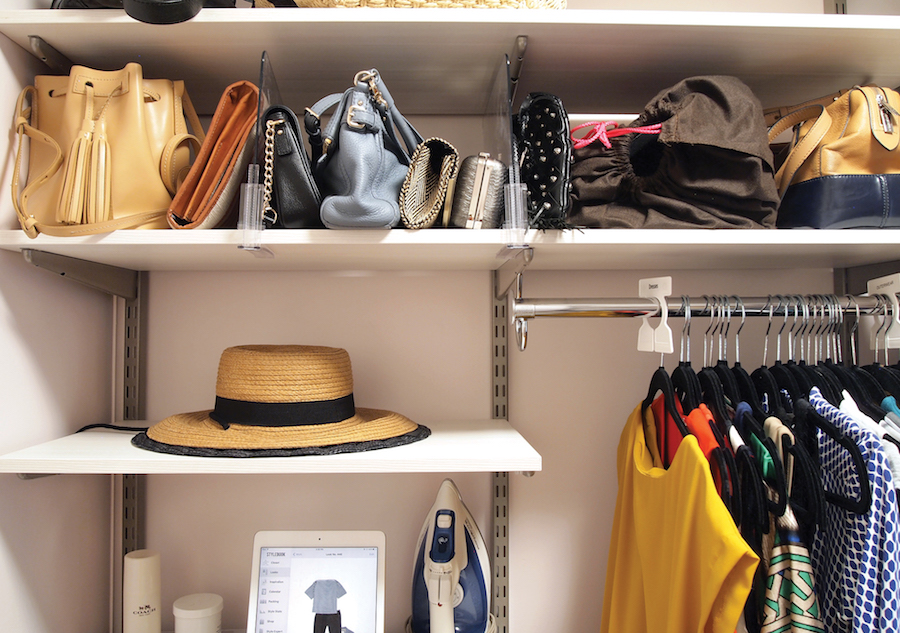
Before I had enough hanging space, my drawers were responsible for storing most of my wardrobe; as a result, they frequently descended into chaos. It didn't matter how I folded my clothes or if I lined them up vertically - it was a mess. This is because when I was in hurry and couldn’t see what I was looking for, I would start digging around and pulling things out. Obviously, if I’m short on time, there’s no way I’m refolding everything at that moment. Luckily, my drawers have mostly been replaced by hanging space and open shelves. I use open shelves with shelf dividers for my jeans, sweaters, and shoes. Everything is visible at eye level - no rummaging required. My Organized Living shelves are 14” deep, which is perfect for a folded piece of clothing, a bag or a pair of shoes. Any deeper and things could get messy.

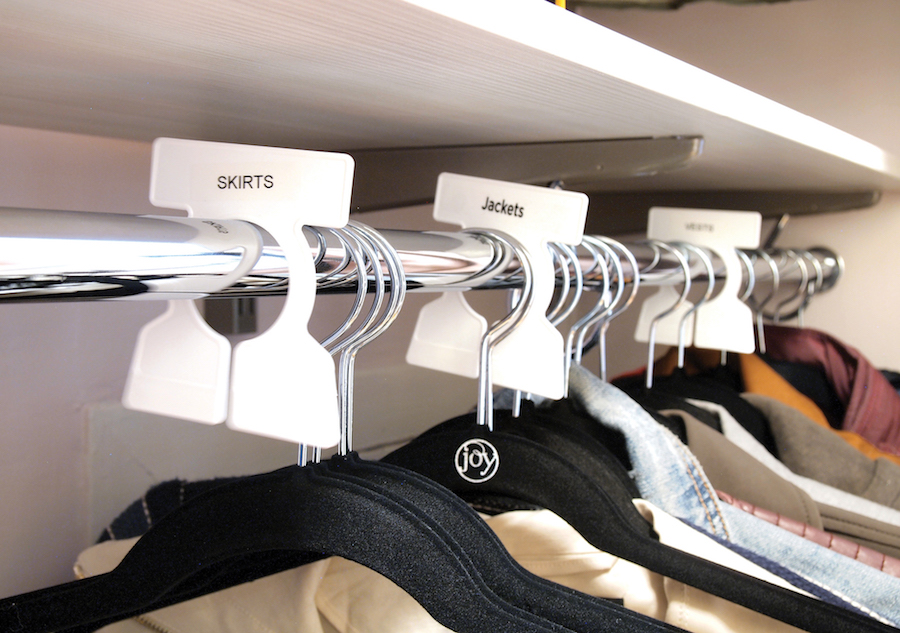
Closet rod labels may seem like organization overkill, but they make finding and putting away clothes a million times easier. I used my Stylebook closet categories to help me decide how to divide up the space. For example, I separate my t-shirts and short-sleeved blouses inside Stylebook so I did the same inside my real closet. Keeping them organized the same way helps me get dressed even faster. I find what I want to wear inside Stylebook and I know exactly where it is in my real closet thanks to the labels. Increasing my wardrobe’s visibility has also really helped with figuring out what clothes are available. Previously I may have wasted 10 or 15 minutes trying to find a top that was actually in the hamper waiting to be washed.
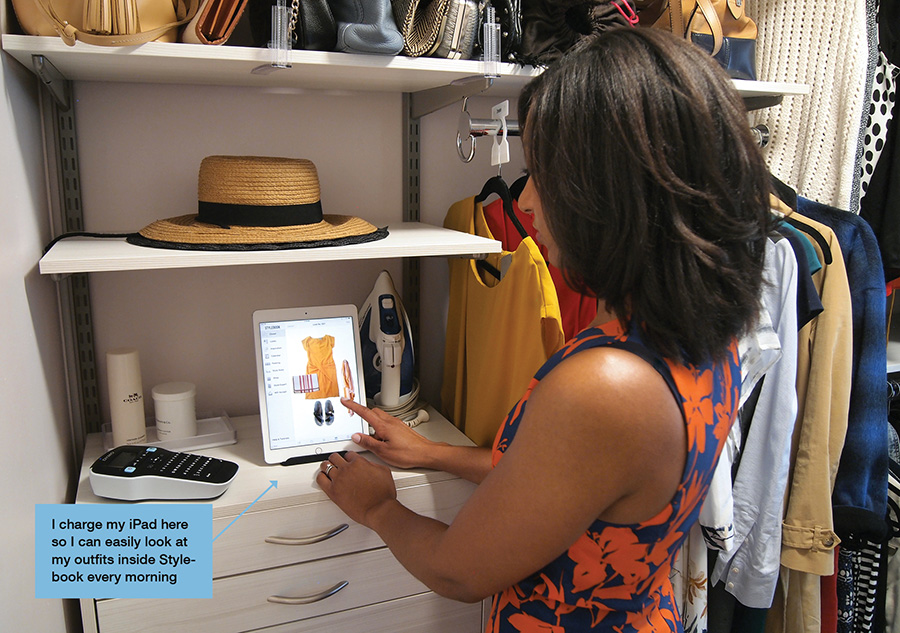
Bonus Tip - I keep an extra copy of my Stylebook outfits on my iPad, so I set up my iPad charger in the closet to create a “Clueless”-style outfit station.
This little organizational tool goes a long way toward preserving order in my closet. I no longer have empty hangers getting tangled up with my clothes and it prevents me from accidentally damaging items by yanking them off the hanger when I take it down. (I know I should know better, but it’s a bad habit.)
I used to try to stuff whatever didn’t fit on my tiny hanging rod into the dresser. Maybe someone out there could keep that organized, but not me! I would try to refold everything about once a month, but within a few days it was back to its usual overflowing mess. Now I use my drawers only for undergarments, workout clothes, and pajamas - basically anything that isn’t contributing to my main wardrobe.
Sometimes it isn’t necessarily clothing that causes a mess in the closet. Old shoe boxes, dust covers and things like that can really add up. To avoid floor clutter, I dedicated a drawer to small items like lint rollers, pill shavers, shoe polish, scissors, etc. I also purchased a storage bin to hold my shoe and boot shapers when they aren’t inside my shoes. Now, when I want to wear a pair of tall boots, I toss the boot shaper in the bin instead of on the floor. It's also a great idea to use a dedicated bin for dust covers for the bags you’re currently carrying.
P.S. Always keep your dust covers (for suede bags especially)! They keep dust and the sun from potentially ruining the leather.

If you have the space for it, I strongly recommend getting a steamer, especially one that has its own stand and hanger. I think you can get the wrinkles out of your clothes much faster than using an iron. Nothing can ruin an outfit faster than sloppy, wrinkly clothes. I learned the value of a good steamer when I was an intern at Modern Bride and I used to steam gigantic wedding gowns all afternoon.
Proper lighting is so important to a closet - you don’t want to look like you got dressed in the dark! I followed Organized Living’s advice and installed a flush-mount LED light because it’s very bright for its size and doesn’t get hot. I also like that the color temperature of the LED I selected makes it easier to tell the difference between tricky colors like navy and black - it's much better than the traditional pull-string light bulb that was in the closet before! Luckily, the closet also has a a window, so I can look at my clothes under natural light. The only drawback is that I have to be sure to draw the curtains. This isn't just for privacy: I keep the blinds drawn when I’m not using the closet to prevent any premature fading from the sunlight!
One thing that makes the closets on Pinterest and Houzz look so amazing is that they’re treated like any other room in the house with carefully thought -out color schemes, textiles, lighting and hardware. The paint I choose was a dusty pink ("Care To Danse" from the Clark-Kensington and OPI collection - yes, wall paint based on nail polish colors!) and it’s one of my favorite colors. I also picked a fun patterned rug and a cool, glass light fixture shaped like a sprocket - these touches help me feel a little joy early in the morning when I have to get up early and get dressed. Here are my decorating tips:
- Paint - Paint your closet a fun color that flatters your skin-tone
- Lights - If you have room for a cool chandelier, go for it, but if you have low ceilings like me, there are some stylish flush-mount lights too!
- Rug - Buy a rug because you’ll probably be in the closet barefoot a lot. Remember that you’ll be trying on your shoes in front of the mirror, so avoid anything that is impossible or expensive to clean.
- Accessories - My walk-in-closet is fairly small, so I chose curtains that are same color as the walls to avoid a cluttered look.
I used to think that a million matching storage bins would transform my real-life closet, but it turns out the key is giving each type of clothing its own dedicated rack or shelf. Organized Living’s FreedomRail System proved I didn’t need a closet the size of a bedroom to get my wardrobe under control and I couldn’t be happier with how it turned out!
Organized Living is a storage and organization company based in Ohio, whose products have been featured on HGTV, A&E and more. They share their expert advice on how to improve your closet inside Stylebook’s Style Expert feature! Visit organizedliving.com for more information on how to get your own dream closet! My closet system was a gift from Organized Living, but all opinions are my own!
NOTE: Posts in the Style Guides series include affiliate links to some of the products discussed. Stylebook receives compensation for purchases made through links to affiliates.